CLICK HERE TO DOWNLOAD THE PATTERN AND PDF INSTRUCTIONS
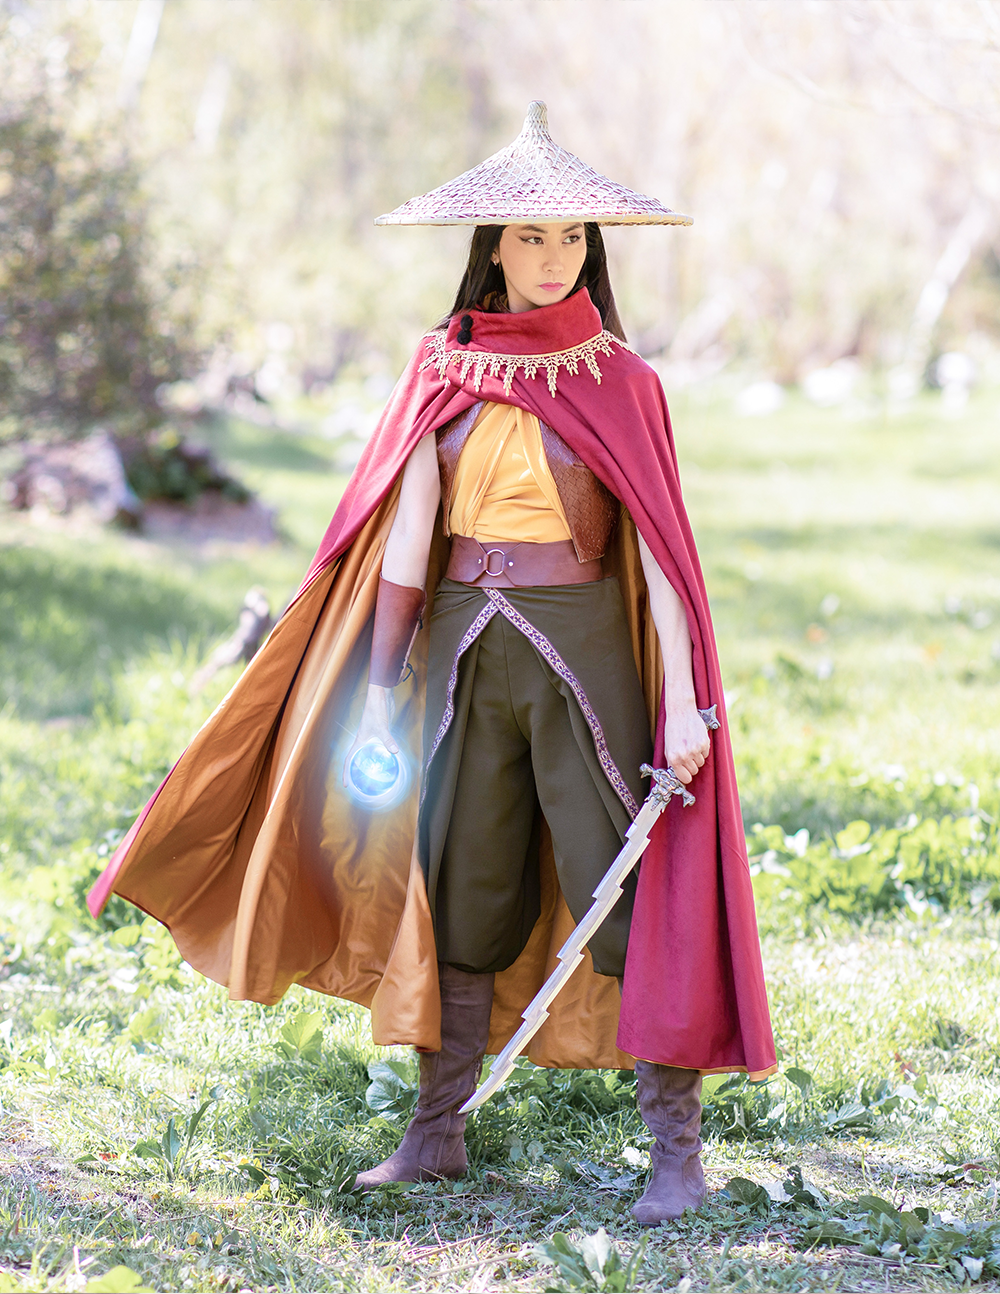
Part 2 of the Raya cloak series takes you through how to use the patterns I provided. I also show you how to mark and cut your fabric. If you haven’t already, check out part 1 and part 3 as well!
Part 1: Assembling the Cloak Pattern Pieces
Part 3: Sewing the Cloak
CLICK HERE TO DOWNLOAD THE PATTERN AND PDF INSTRUCTIONS
Part 2: Cutting the Fabric
What you will need:
- Pattern pieces (Refer to Part 1: Assembling the Cloak Pattern Pieces)
- Red Fabric (amounts below)
- Yellow Lining (amounts below)
- Interfacing or felt (32” x 6”)
- Scissors
- Measuring tape
- Chalk or fabric pen
How much fabric?
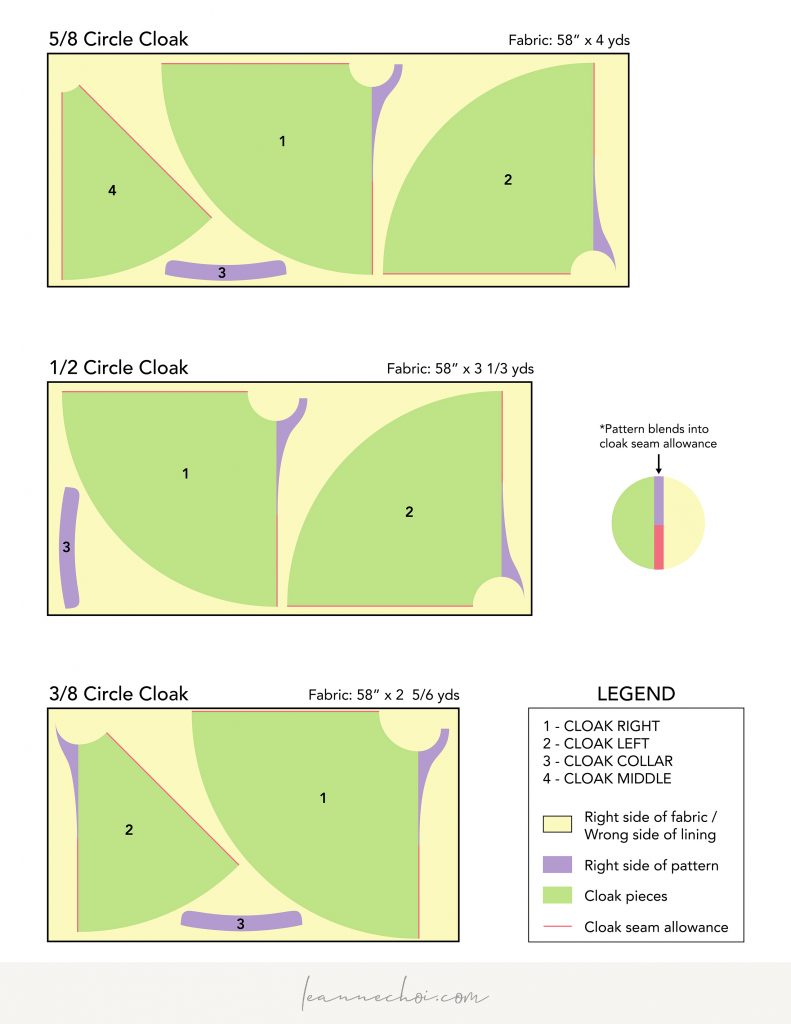
It depends on how big of a cloak you want to make. And by that I mean, the size doesn’t relate to the fit, but more of how much flare you want the cloak to have. I have provided 3 options:
| Cloak Size | Amount of Fabric | Amount of Lining |
| 5/8 Circle Cloak | 58” x 144” (4 yds) | 58” x 144” (4 yds) |
| 1/2 Circle Cloak | 58” x 120” (3 1/3 yds) | 58” x 120” (3 1/3 yds) |
| 3/8 Circle Cloak | 58” x 102” (2 5/6 yds) | 58” x 102” (2 5/6 yds) |
Note: The pattern pieces included are optimized for a 5/8 circle cloak. In theory it should still work with a 1/2 or a 3/8 cloak, but I have not tested it. So I cannot guarantee that the fit will be 100% accurate on a smaller cloak.
Step 1: figuring out the layout of the pattern pieces
Once you have determined how big of a cloak you want to make, refer to the below image for how all the pieces will fit on the fabric.
Step 2: Marking out the cloak sections
You will need to mark out the circle cloak pieces yourself. Below are the radiuses for each size cloak. If you need a longer or shorter cloak, adjust the TOTAL LENGTH RADIUS.
| Cloak Size | Total Length Radius | Neckhole Radius |
| 5/8 Circle Cloak | 52″ | 5 5/8″ |
| 1/2 Circle Cloak | 53″ | 7 1/8″ |
| 3/8 Circle Cloak | 56″ | 9 5/8″ |
Please note that these measurements only include seam allowance on the curved edges. They DO NOT include seam allowance on the straight edges. You will need to add that in the next step.
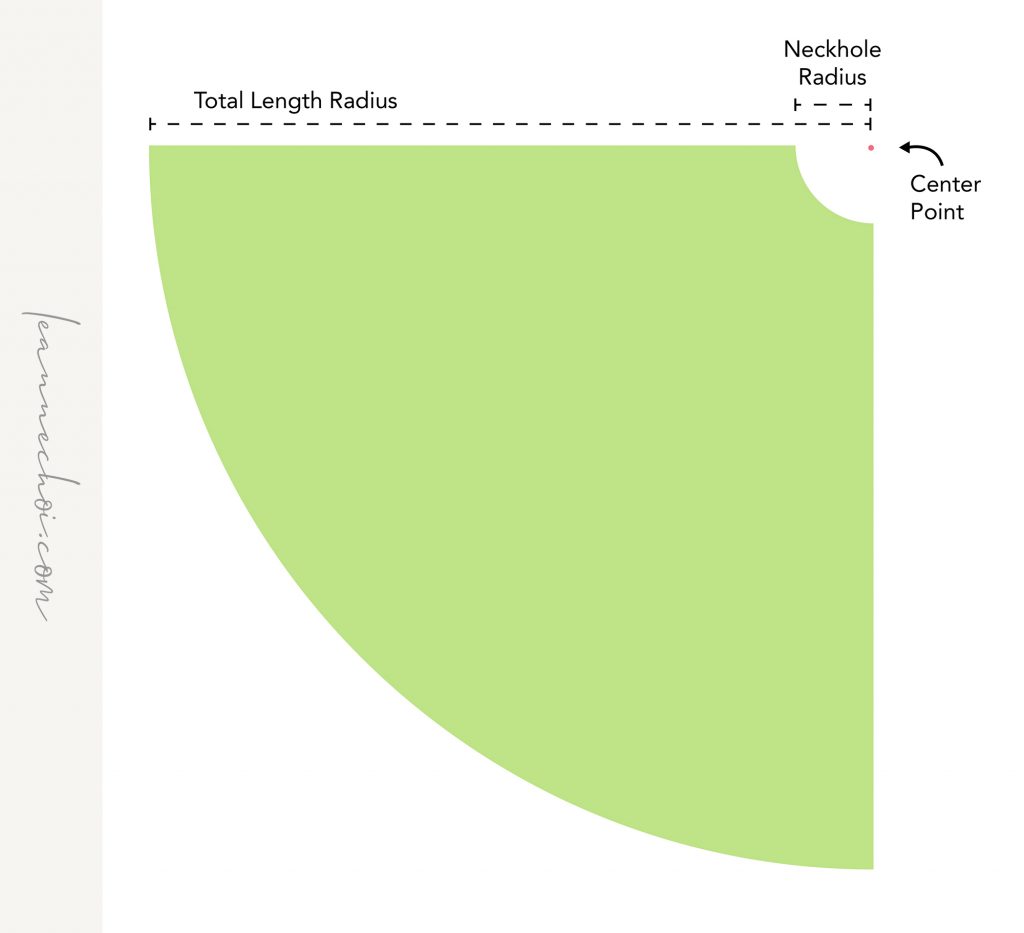
- On the RIGHT SIDE of the fabric, determine a CENTER POINT for each piece of your circle.
- Measure and mark out the TOTAL LENGTH RADIUS from the center point.
- Then measure and mark out the NECKHOLE RADIUS from the same center point.
- Add a 1/2” seam allowance to each straight edge.
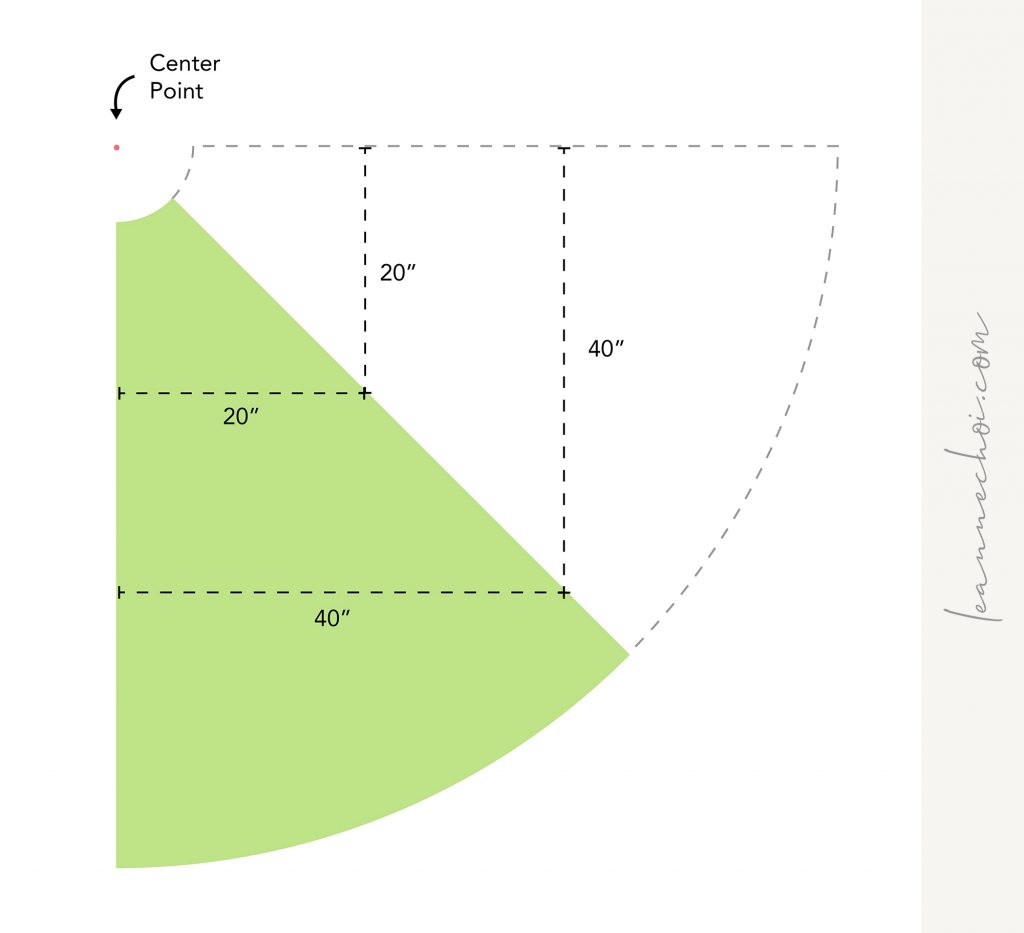
- (If applicable) The 1/8 circle pieces are marked at a 45° angle. To determine the angle:
- Measure and mark a point 20” and 40” from the center point as illustrated.
- Then draw a line from the center point to the edge, connecting the dots.
- Measure and mark a point 20” and 40” from the center point as illustrated.
Step 3: Adding the extension pieces
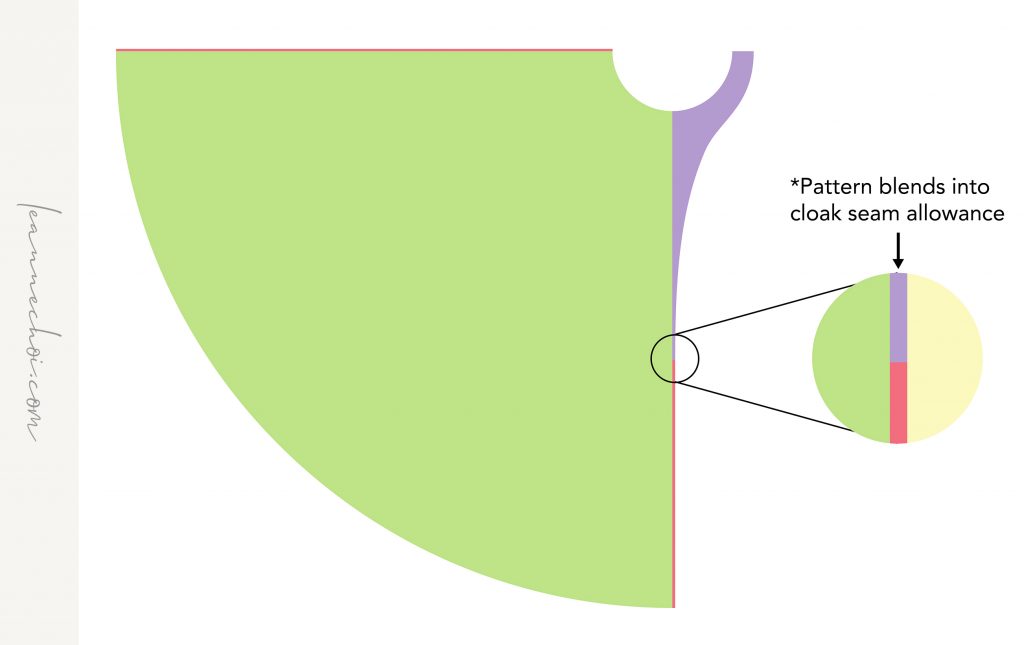
Add the extension pieces ON TOP of the seam allowance you marked out, matching the corner of the neckhole. The extension piece already includes seam allowances, so the 1/2” of the pattern should blend into the 1/2” you added to the circle cloak piece.
Step 4: Cutting out the fabric
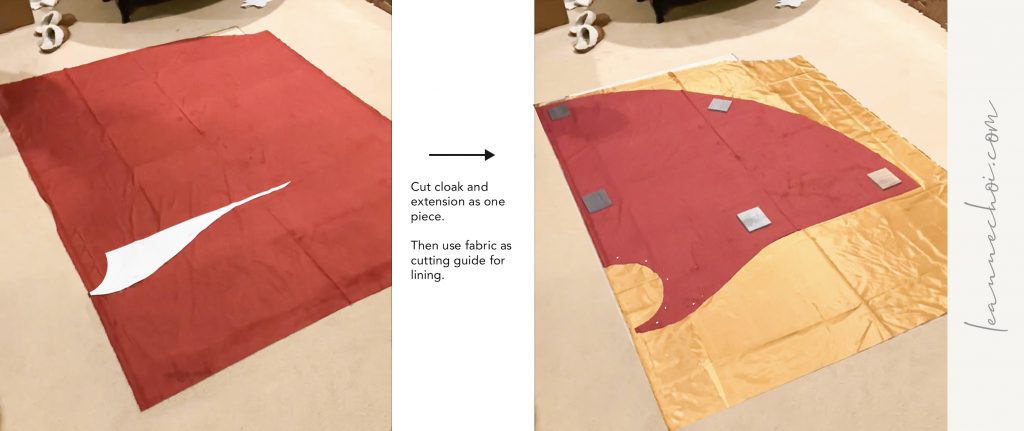
- Cut the circle cloak and the extension as ONE PIECE. You should end up with one right side and one left side (and a middle if you are making a 5/8 cloak).
- Now use your cut out fabric pieces as cutting guides (or you can repeat steps 1-3) on the WRONG SIDE of the lining.
- Cut the collar piece from the remaining fabric and lining, as well as from the interfacing/felt.
Continue on with Part 3: Sewing the Cloak for instructions on assembling the cloak.




What do you think?